Notice: this is a fork of [The original NeRF++
implementation](https://github.com/Kai-46/nerfplusplus).
# NeRF++
Codebase for arXiv preprint ["NeRF++: Analyzing and Improving Neural Radiance Fields"](http://arxiv.org/abs/2010.07492)
* Work with 360 capture of large-scale unbounded scenes.
* Support multi-gpu training and inference with PyTorch DistributedDataParallel (DDP).
* Optimize per-image autoexposure (**experimental feature**).
## Demo
## Data
* Download our preprocessed data from [tanks_and_temples](https://drive.google.com/file/d/11KRfN91W1AxAW6lOFs4EeYDbeoQZCi87/view?usp=sharing), [lf_data](https://drive.google.com/file/d/1gsjDjkbTh4GAR9fFqlIDZ__qR9NYTURQ/view?usp=sharing).
* Put the data in the sub-folder data/ of this code directory.
* Data format.
* Each scene consists of 3 splits: train/test/validation.
* Intrinsics and poses are stored as flattened 4x4 matrices (row-major).
* Pixel coordinate of an image's upper-left corner is (column, row)=(0, 0), lower-right corner is (width-1, height-1).
* Poses are camera-to-world, not world-to-camera transformations.
* Opencv camera coordinate system is adopted, i.e., x--->right, y--->down, z--->scene. Similarly, intrinsic matrix also follows Opencv convention.
* To convert camera poses between Opencv and Opengl conventions, the following code snippet can be used for both Opengl2Opencv and Opencv2Opengl.
```python
import numpy as np
def convert_pose(C2W):
flip_yz = np.eye(4)
flip_yz[1, 1] = -1
flip_yz[2, 2] = -1
C2W = np.matmul(C2W, flip_yz)
return C2W
```
* Scene normalization: move the average camera center to origin, and put all the camera centers inside the unit sphere.
## Create environment
```bash
conda env create --file environment.yml
conda activate nerfplusplus
```
## Training (Use all available GPUs by default)
```python
python ddp_train_nerf.py --config configs/tanks_and_temples/tat_training_truck.txt
```
## Testing (Use all available GPUs by default)
```python
python ddp_test_nerf.py --config configs/tanks_and_temples/tat_training_truck.txt \
--render_splits test,camera_path
```
**Note**: due to restriction imposed by torch.distributed.gather function, please make sure the number of pixels in each image is divisible by the number of GPUs if you render images parallelly.
## Citation
Plese cite our work if you use the code.
```python
@article{kaizhang2020,
author = {Kai Zhang and Gernot Riegler and Noah Snavely and Vladlen Koltun},
title = {NeRF++: Analyzing and Improving Neural Radiance Fields},
journal = {arXiv:2010.07492},
year = {2020},
}
```
## Generate camera parameters (intrinsics and poses) with [COLMAP SfM](https://colmap.github.io/)
You can use the scripts inside `colmap_runner` to generate camera parameters from images with COLMAP SfM.
* Specify `img_dir` and `out_dir` in `colmap_runner/run_colmap.py`.
* Inside `colmap_runner/`, execute command `python run_colmap.py`.
* After program finishes, you would see the posed images in the folder `out_dir/posed_images`.
* Distortion-free images are inside `out_dir/posed_images/images`.
* Raw COLMAP intrinsics and poses are stored as a json file `out_dir/posed_images/kai_cameras.json`.
* Normalized cameras are stored in `out_dir/posed_images/kai_cameras_normalized.json`. See the **Scene normalization method** in the **Data** section.
* Split distortion-free images and `kai_cameras_normalized.json` according to your need. You might find the self-explanatory script `data_loader_split.py` helpful when you try converting the json file to data format compatible with NeRF++.
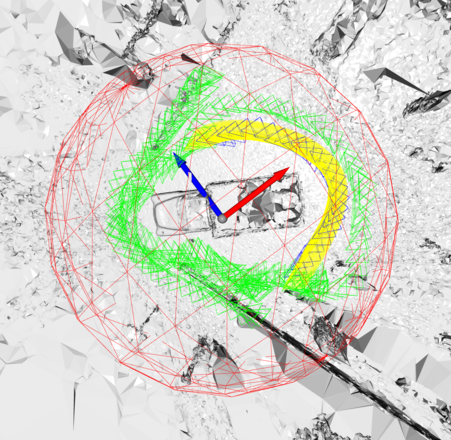
## Visualize cameras in 3D
Check `camera_visualizer/visualize_cameras.py` for visualizing cameras in 3D. It creates an interactive viewer for you to inspect whether your cameras have been normalized to be compatible with this codebase. Below is a screenshot of the viewer: green cameras are used for training, blue ones are for testing, while yellow ones denote a novel camera path to be synthesized; red sphere is the unit sphere.
 ## Inspect camera parameters
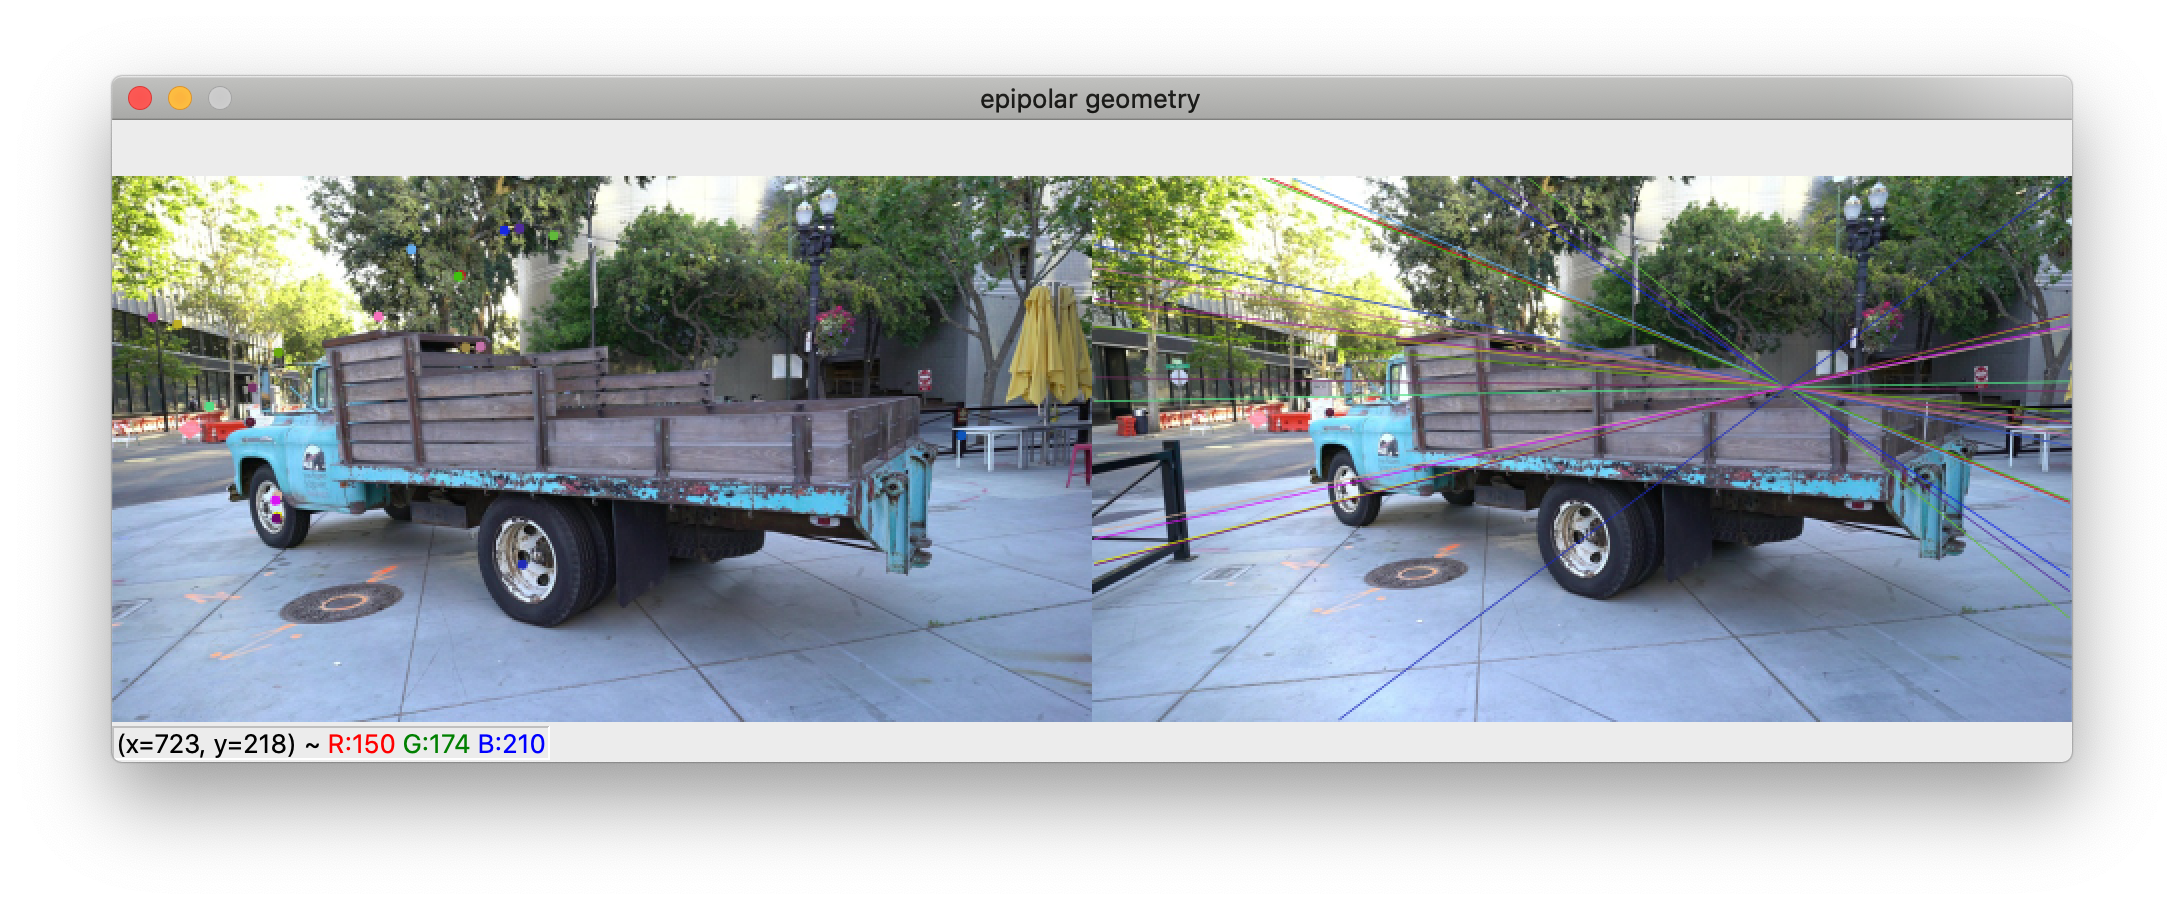
You can use `camera_inspector/inspect_epipolar_geometry.py` to inspect if the camera paramters are correct and follow the Opencv convention assumed by this codebase. The script creates a viewer for visually inspecting two-view epipolar geometry like below: for key points in the left image, it plots their correspoinding epipolar lines in the right image. If the epipolar geometry does not look correct in this visualization, it's likely that there are some issues with the camera parameters.
## Inspect camera parameters
You can use `camera_inspector/inspect_epipolar_geometry.py` to inspect if the camera paramters are correct and follow the Opencv convention assumed by this codebase. The script creates a viewer for visually inspecting two-view epipolar geometry like below: for key points in the left image, it plots their correspoinding epipolar lines in the right image. If the epipolar geometry does not look correct in this visualization, it's likely that there are some issues with the camera parameters.